THE TIME HAS COME TO…PUSH THE BUTTON
Wireless communication between Arduino #1 and #2
My current project in IxD Prototyping involves physical computing (i.e., “interactive systems that can sense and respond to the world around them.”) I have worked with Arduino before (Restricted Area, 2017) but this newest project is expected to have a daily use. In my head, I keep a long list of annoying technology interactions—this gets updated frequently. We are saturated with unsatisfying technology and devices that cause more problems than they solve. We have inconveniences stacked upon inconveniences, and if we were to step outside of this environment, you would inevitably conclude that most electronics are made to punish the buyers. I am looking to improve just one such interaction.
Back in 2012 I bought an HD video projector. If you love to watch movies, there is something magical about having “the big screen” at home. I love it. Do you know what I don’t love? Using an infrared remote control on a devices that is mounted above and behind me. Seriously, Epson: what where you guys (and yes, I’m assuming it was a team of men, with their dumb penises getting in the way of common sense) thinking?! The primary function of the remote control is to simply turn the projector on and off. I would gladly give up the remote control entirely if I could simply move the power button to the armrest of my couch. Instead, I must contort my arm in Kama Sutra fashion just to find the right angle to get the sensor to recognize the POWER-ON command from the remote.
Getty Images: the various methods for turning on an Epson HD Projector.
My girlfriend’s method to bypass the projector is more elegant: she retrieves a step-stool from our utility closet and presses the ON/OFF button on the projector chassis. This works well, but … well, let’s just say, it ruins the mood. I began to explore other options, and realized that the primary issue is that IR remotes are directional. The IR sensor is part of the assembly, and cannot be relocated. Arduino is capable of IR communication, it is also capable of RF communication. Radio frequency is far less dependent on line-of-sight, especially within the context of indoor and residential use. Imagine what WiFi would be like if it worked over infrared. Consider also that Apple abandoned their IR remote interface for the Mac.
Enter the Arduino
I found a few open source projects that utilize IR and RF communication:
https://learn.sparkfun.com/tutorials/ir-communication/all
https://www.electroschematics.com/ir-decoder-encoder-part-2-diy-38-khz-irtr-module/
https://learn.adafruit.com/using-an-infrared-library/hardware-needed
https://www.sparkfun.com/datasheets/Components/nRF24L01_prelim_prod_spec_1_2.pdf (PDF Warning)
https://www.deviceplus.com/arduino/nrf24l01-rf-module-tutorial/
https://forum.arduino.cc/index.php?topic=421081.0
https://howtomechatronics.com/tutorials/arduino/arduino-wireless-communication-nrf24l01-tutorial/
All of these resources are excellent. I want to call attention to one more link: https://create.arduino.cc/projecthub/muhammad-aqib/nrf24l01-interfacing-with-arduino-wireless-communication-0c13d4
I have a bone to pick with this one. Take a look at the wiring diagram:
Diagram created by /u/Muhammadaqibdutt
Note the LED pin-out for the receiver. This diagram shows the positive leg of the LED connecting to Pin 3
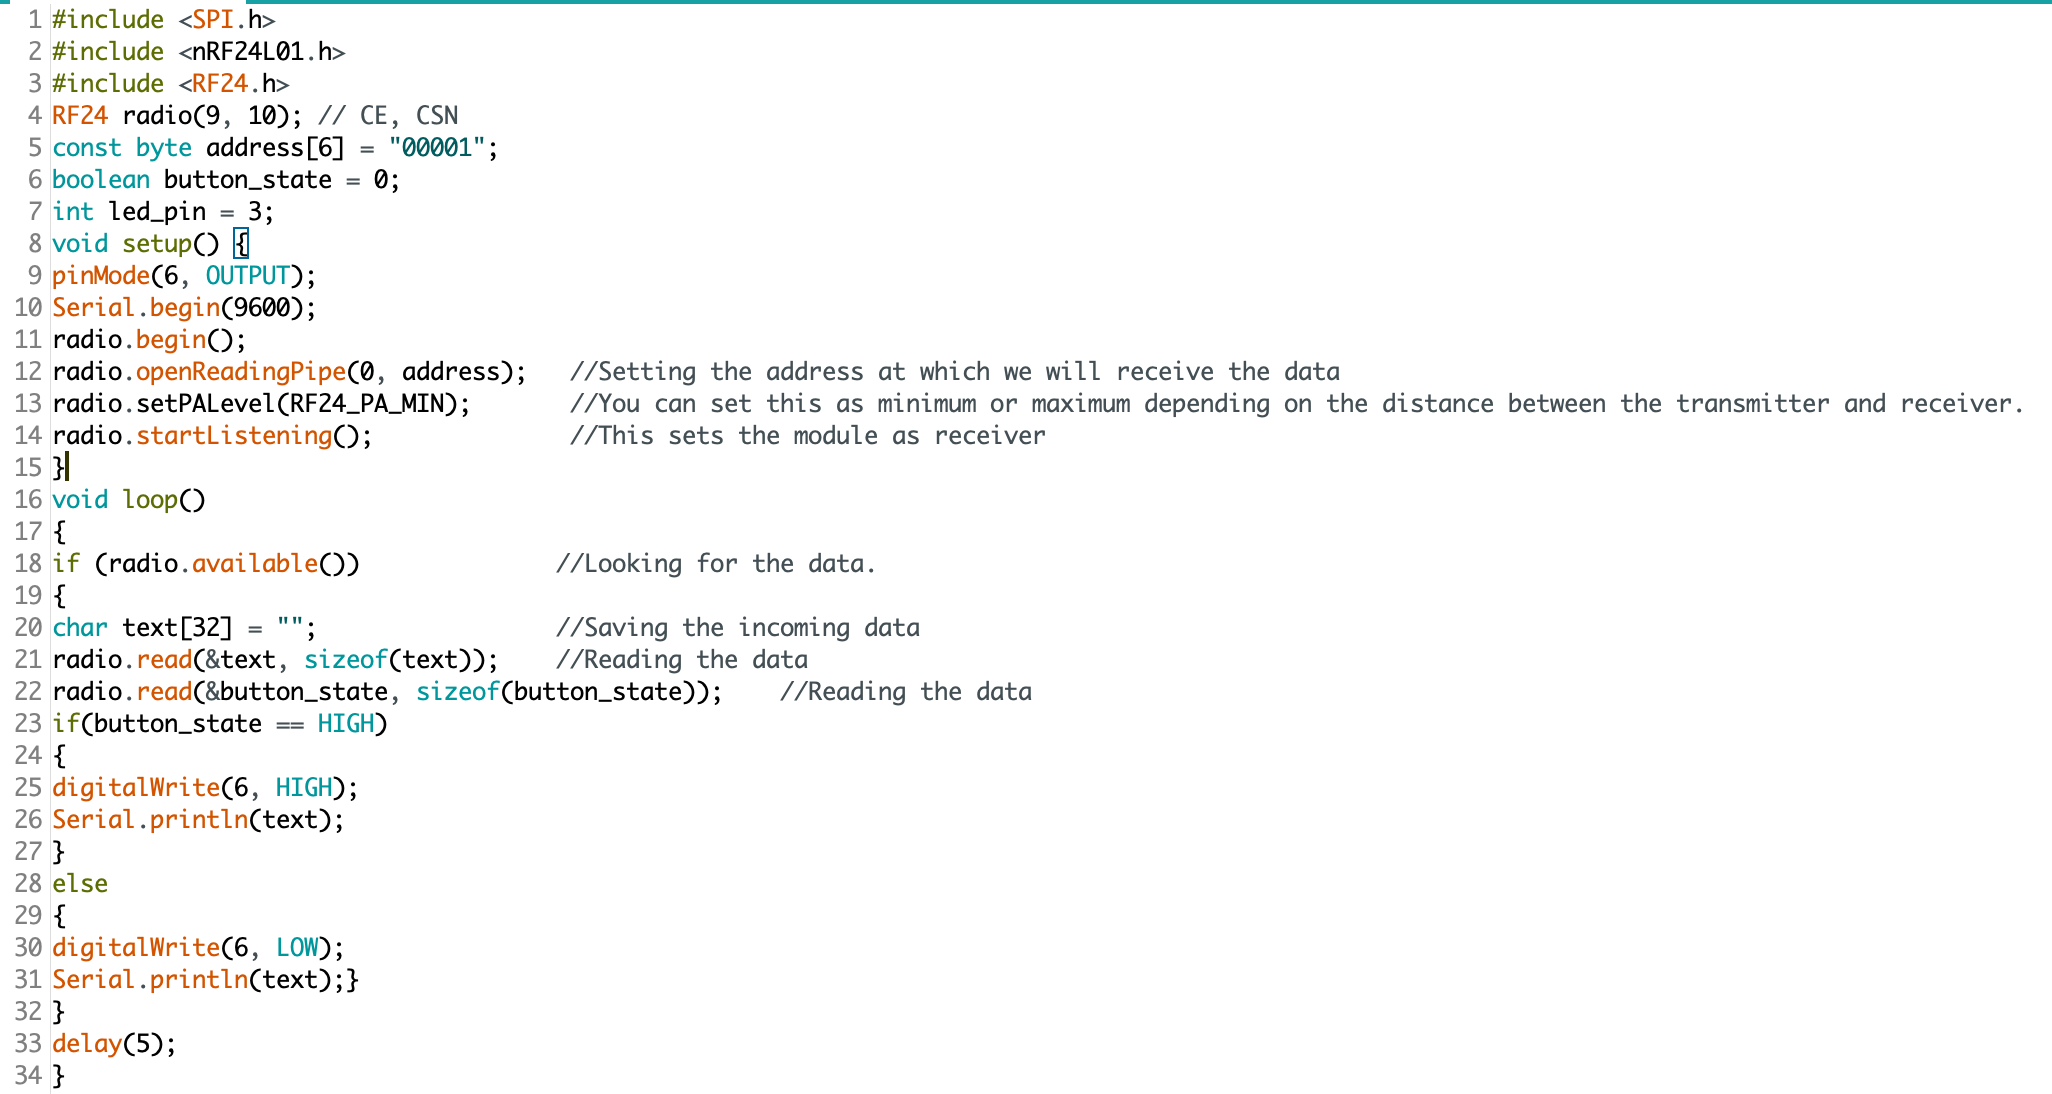
Now, lets take a look at the code:
The devil is in the details: “digitalWrite(6, HIGH)” condition turns the LED on. Pin 3 does nothing.
This made for some very “fun” troubleshooting. I’ve since ironed out all the kinks, and have successfully pirated the IR remote signal from an Epson brand projector (on loan from the Design Office at CMU), and have moved on to making an enclosure. Will I 3D print or laser cut? I have not yet decided.
Here is some sample code for my RF triggered IR emitter:
(NOTE: this code is just one half of the project, and by itself cannot do anything. You’ll also need IR and RF libraries to make this code work on your Arduino)
#include <SPI.h>
#include <nRF24L01.h>
#include <RF24.h>
#include <IRLibAll.h>
RF24 radio(9, 10); // CE, CSN
const byte address[6] = "00001";
boolean button_state = 0;
int led_pin = 3;
IRsend mySender;
void setup() {
  pinMode(6, OUTPUT);
  Serial.begin(9600);
  radio.begin();
  radio.openReadingPipe(0, address);
  radio.setPALevel(RF24_PA_MIN);
  radio.startListening();
}
void loop()
{
  if (radio.available())
  {
    char text[32] = "";
    radio.read(&text, sizeof(text));
    radio.read(&button_state, sizeof(button_state));
    if (button_state == HIGH)
    {
      digitalWrite(6, HIGH);
      Serial.println(text);
      //Arduino Remote On/Off button code
      mySender.send(NEC, 0xffa25d);
    }
    else
    {
      digitalWrite(6, LOW);
      Serial.println(text);
    }
  }
  delay(5);
}


